

I have been using Arch Linux on my desktop on a daily basis for a good of six months now. The upcoming end of support for Windows 10 in 2025 [1] and the looming switch to Windows 11 (not as long as I can avoid it Microsoft!) have prompted me to rely on the Penguin in this area too.
I'm using Arch Linux in general satisfactorily for just over 10 years, primarly on my laptops. Nevertheless, I wanted to test the conditions on the desktop first and installed the system in dual boot on a small 256 GB NVMe SSD.
After a successful test phase, during which I mainly checked the now well-developed (thanks to DXVK [2] and Proton [3] ) gaming capabilities (games with RICOCHET anti-cheat excluded, Hi Activision) and hardware compatibility - it's now time for the complete switch.
For this purpose, I have bought a inexpensive WD Blue SN580 2TB, on which the system will live in the future.
To avoid a new installation, I set myself the goal of mirroring the existing system to the new storage device, adjusting the partitions and then applying all the necessary changes in fstab & grub (the latter in particular turned out to be easier than expected).
But first to the partitioning; basically I run a system on an encrypted LUKS container on which an LVM is set up. EFI and boot partition are not encrypted. To realize this, I have three physical partitions on the “bare metal” of the old 256 GB SSD (nvme0n1).
name |
format |
size |
|---|---|---|
EFI |
fat32 |
100MB |
Boot |
ext4 |
512MB |
LUKS |
crypto_LUKS |
237.9GB |
The encrypted LUKS container [4] contains only one volume group (VG) on its physical volume (PV), which contains 3 logical volumes (LV).
name |
format |
size |
|---|---|---|
SWAP |
swap |
8GB |
root |
ext4 |
48GB |
home |
ext4 |
181.1GB |

Illustration: structures on nvme0n1
The goal of the mirroring was to keep the existing structures, transfer them to the new SSD and only adjust the size of the root and home partitions.
To accomplish this, it is necessary to extend the LUKS partition as well as the storage space available to the volume group. The two logical volumes (root & home) and its respective ext4 parts, can then be expanded.
But one step at a time. I started by creating an Arch Live medium from which I could make changes to the system.
Live USB
For this I first downloaded the current Arch ISO from archlinux.org. The official guide for creating a USB boot medium can be found in the Wiki .
Of course you need a USB stick of 4GB+, which will be completely wiped.
You can then use
or
to find the respective stick and execute
to write the ISO file including boot flags to the medium.
Important! Ensure you set the correct target, otherwise you may overwrite parts of your system.
Live Boot
With the Live USB you can now boot.
In my case, I start by adjusting the keyboard layout. This step is optional.
After that I used
to display the layout of the block devices. It should look something like this:
NAME           MAJ:MIN RM   SIZE RO TYPE  MOUNTPOINTS
loop0            7:0    0 790.3M  1 loop  /run/archiso/airootfs
sda              8:0    0 447.1G  0 disk
├─sda1           8:1    0   450M  0 part
├─sda2           8:2    0    99M  0 part
├─sda3           8:3    0    16M  0 part
└─sda4           8:4    0 446.6G  0 part
sdb              8:16   0 223.6G  0 disk
└─sdb1           8:17   0 223.6G  0 part
sdc              8:32   0 953.9G  0 disk
├─sdc1           8:33   0    16M  0 part
└─sdc2           8:34   0 953.9G  0 part
nvme0n1        259:0    0 238.5G  0 disk
├─nvme0n1p1    259:1    0   100M  0 part
├─nvme0n1p2    259:2    0   512M  0 part
└─nvme0n1p3    259:3    0 237.9G  0 part
nvme1n1        259:4    0   1.8T  0 disk
Once the two block devices (source and target) are identified, the mirroring can begin.
I used plain dd for this.
flag |
purpose |
|---|---|
if |
is the source file |
of |
is the target file |
bs=64M |
sets the block size for writing to 64 megabytes and increases the throughput |
conv=fsync |
forces the data in the target to be written first, which guarantees consistency |
conv=notrunc |
prevents truncation on the target, not really necessary with conv=fsync |
oflag=direct |
bypasses the buffer of the operating system and writes the data directly to the medium, this also increases performance |
status=progess |
shows the progress of the copy process |
It should look as follows.
root@archiso ~# dd if=/dev/nvme0n1 of=/dev/nvme1n1 bs=64M conv=fsync,notrunc oflag=direct status=progress
15636365312 bytes (16 GB, 15 GiB) copied, 19s, 823 MB/s
Depending on the size of the medium to be mirrored and the read/write speed of the devices, this may take several minutes.
root@archiso ~# dd if=/dev/nvme0n1 of=/dev/nvme1n1 bs=64M conv=fsync,notrunc oflag=direct status=progress

3815+1 records in
3815+1 records out
256060514304 bytes (256 GB, 238 GiB) copied, 314.535 s, 814 MB/s
dd if=/dev/nvme0n1 of=/dev/nvme1n1 bs=64M conv=fsync,notrunc oflag=direct  0.1s user 76.67s system 24% cpu 5:14.54 total
This finishes the first step of mirroring. I checked the device state with
again. It should now look like this.
NAME           MAJ:MIN RM   SIZE RO TYPE  MOUNTPOINTS
loop0            7:0    0 790.3M  1 loop  /run/archiso/airootfs
sda              8:0    0 447.1G  0 disk
├─sda1           8:1    0   450M  0 part
├─sda2           8:2    0    99M  0 part
├─sda3           8:3    0    16M  0 part
└─sda4           8:4    0 446.6G  0 part
sdb              8:16   0 223.6G  0 disk
└─sdb1           8:17   0 223.6G  0 part
sdc              8:32   0 953.9G  0 disk
├─sdc1           8:33   0    16M  0 part
└─sdc2           8:34   0 953.9G  0 part
nvme0n1        259:0    0 238.5G  0 disk
├─nvme0n1p1    259:5    0   100M  0 part
├─nvme0n1p2    259:6    0   512M  0 part
└─nvme0n1p3    259:7    0 237.9G  0 part
nvme1n1        259:4    0   1.8T  0 disk
├─nvme1n1p1    259:8    0   100M  0 part
├─nvme1n1p2    259:9    0   512M  0 part
└─nvme1n1p3    259:10   0 237.9G  0 part
We see that the old layout has been successfully transfered to the new device. However, since the old partition table and states of the LVM were also transferred from nvme0n1 to nvme1n1, the space at the end of nvme1n1p3 (the LUKS partition) is not realized.

Illustration: mirrored structure on nvme1n1
LUKS Partition Resize
But before we start with the resizing, we should define the goal from what we want to achieve.
name |
format |
size |
|---|---|---|
EFI |
fat32 |
100MB |
Boot |
ext4 |
512MB |
LUKS |
crypto_LUKS |
1.8TB |
name |
format |
size |
|---|---|---|
SWAP |
swap |
8GB |
root |
ext4 |
250GB |
home |
ext4 |
1.4TB |
As already stated, I will only enlarge the root and home partitions. The 8 GB swap is sufficient for me, as I have enough RAM available.
First of all, the crypt_LUKS partition must be extended. To do this, I opened nvme1n1 with parted.
As soon as the block device is opened, (in my case) the third partition can be enlarged.
The argument specifies that the third partition should “grow” by 100% over all available sectors and occupy them.
LUKS Container Resize
In the next step I enlarged the LUKS container, for this it must be opened. I have chosen lvmcrypt as the mapping name.
The size of the container can then be increased.
I checked the state again with.
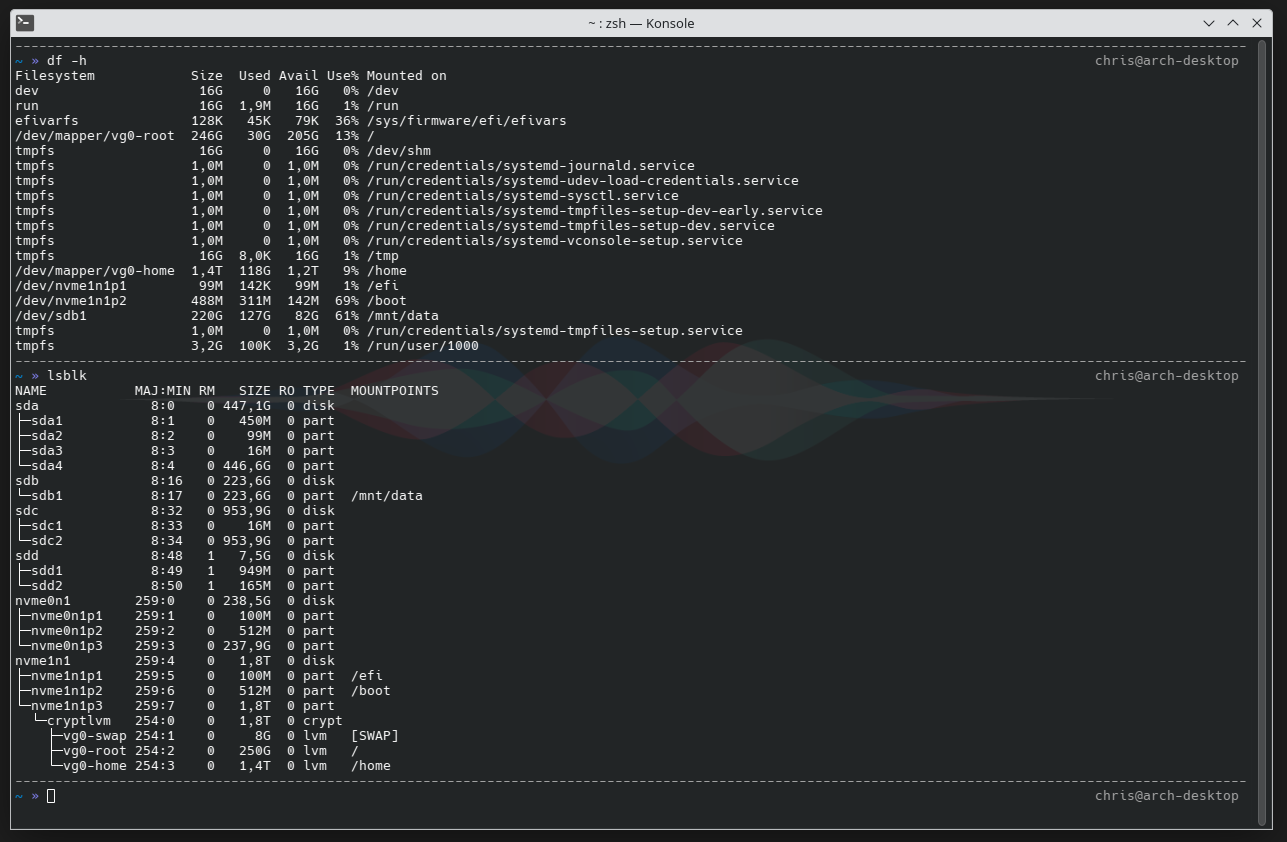
NAME           MAJ:MIN RM   SIZE RO TYPE  MOUNTPOINTS
loop0            7:0    0 790.3M  1 loop  /run/archiso/airootfs
sda              8:0    0 447.1G  0 disk
├─sda1           8:1    0   450M  0 part
├─sda2           8:2    0    99M  0 part
├─sda3           8:3    0    16M  0 part
└─sda4           8:4    0 446.6G  0 part
sdb              8:16   0 223.6G  0 disk
└─sdb1           8:17   0 223.6G  0 part
sdc              8:32   0 953.9G  0 disk
├─sdc1           8:33   0    16M  0 part
└─sdc2           8:34   0 953.9G  0 part
nvme0n1        259:0    0 238.5G  0 disk
├─nvme0n1p1    259:5    0   100M  0 part
├─nvme0n1p2    259:6    0   512M  0 part
└─nvme0n1p3    259:7    0 237.9G  0 part
nvme1n1        259:5    0   1.8T  0 disk
├─nvme1n1p1    259:8    0   100M  0 part
├─nvme1n1p2    259:9    0   512M  0 part
└─nvme1n1p3    259:10   0   1,8T  0 part
  └─lvmcrypt   254:0    0   1,8T  0 crypt
    ├─vg0-swap 254:1    0     8G  0 lvm
    ├─vg0-root 254:2    0    48G  0 lvm
    └─vg0-home 254:3    0 181.6G  0 lvm
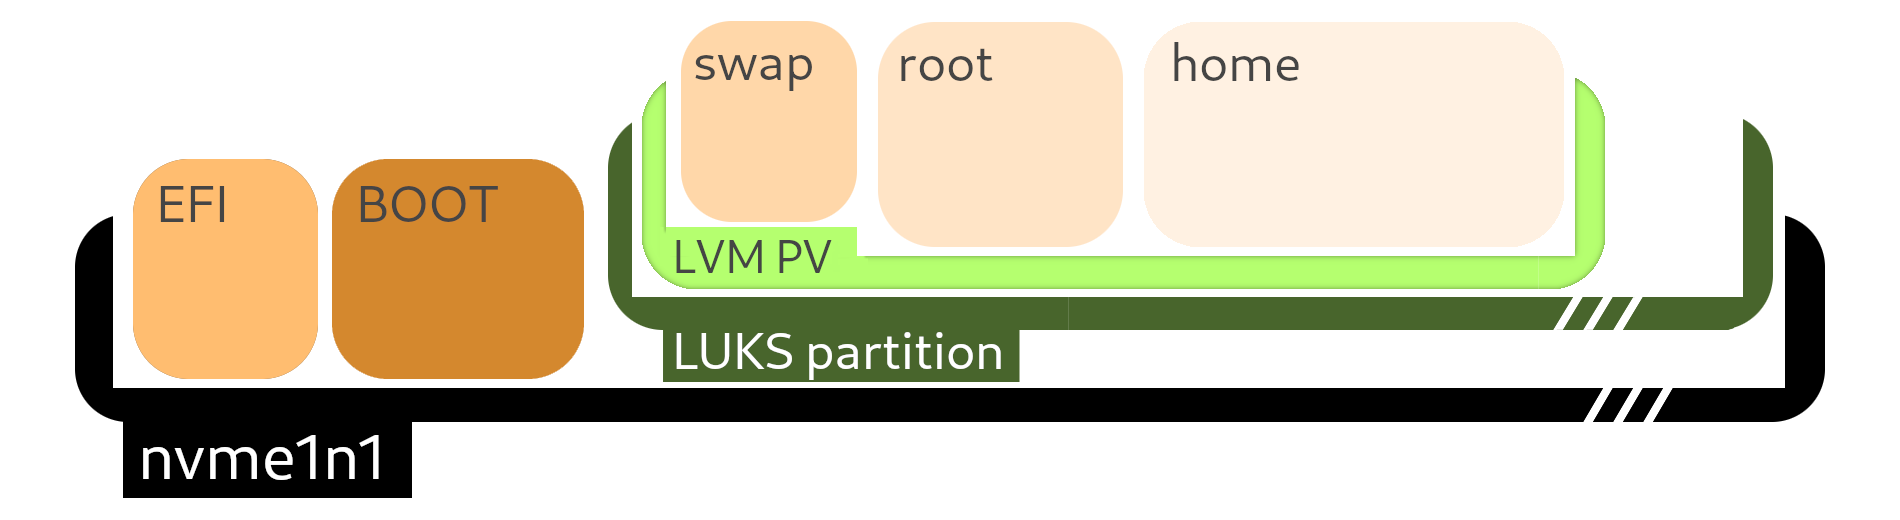
Illustration: extended crypt_LUKS partition and adapted LUKS container.
PV & LVM Resize
Now the physical volume has to be modified, this is done with (pay attention to the correct mapper).
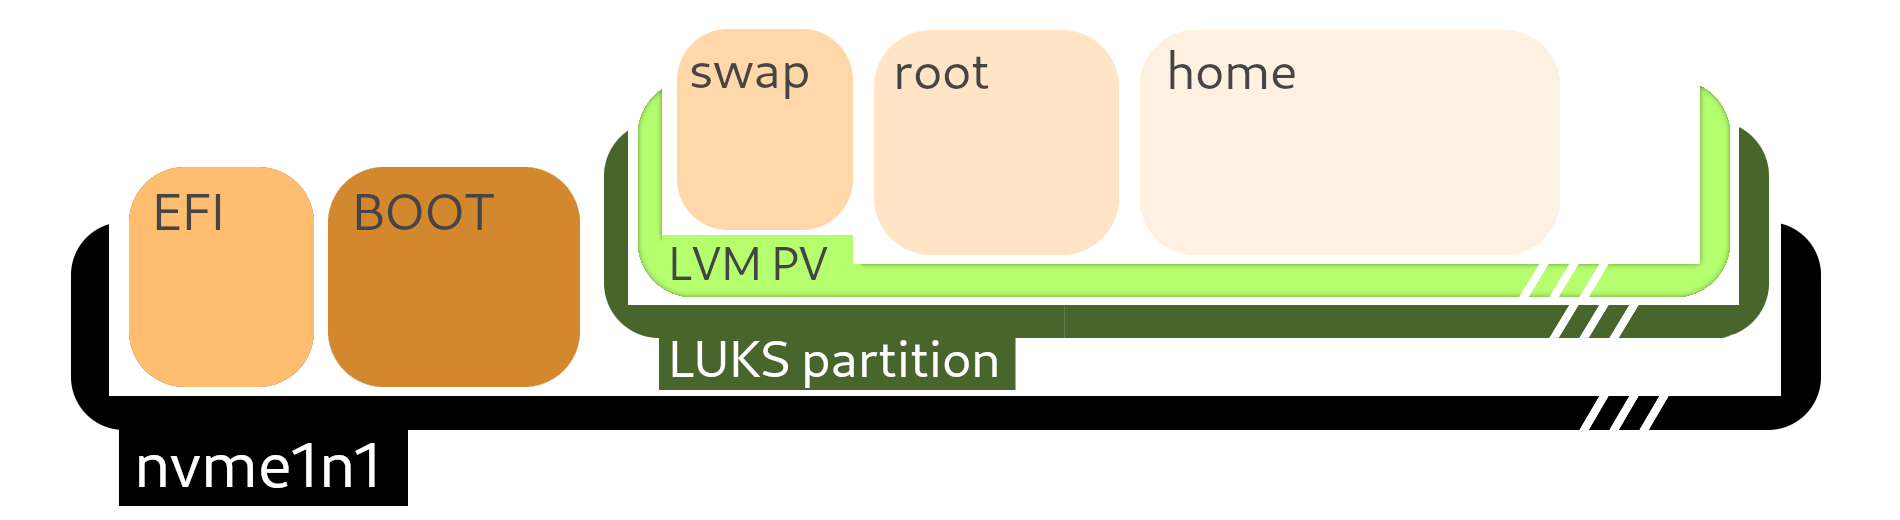
Illustration: resized PV
and finally the two logical volumes will be adjusted.
Since the logical volumes contain ext4 partitions, these are first checked for consistency and then extended in order to utilize the available space of the logical volumes.
.. reveals that the stand is virtually correct ..
NAME           MAJ:MIN RM   SIZE RO TYPE  MOUNTPOINTS
loop0            7:0    0 790.3M  1 loop  /run/archiso/airootfs
sda              8:0    0 447.1G  0 disk
├─sda1           8:1    0   450M  0 part
├─sda2           8:2    0    99M  0 part
├─sda3           8:3    0    16M  0 part
└─sda4           8:4    0 446.6G  0 part
sdb              8:16   0 223.6G  0 disk
└─sdb1           8:17   0 223.6G  0 part
sdc              8:32   0 953.9G  0 disk
├─sdc1           8:33   0    16M  0 part
└─sdc2           8:34   0 953.9G  0 part
nvme0n1        259:0    0 238.5G  0 disk
├─nvme0n1p1    259:5    0   100M  0 part
├─nvme0n1p2    259:6    0   512M  0 part
└─nvme0n1p3    259:7    0 237.9G  0 part
nvme1n1        259:5    0   1.8T  0 disk
├─nvme1n1p1    259:8    0   100M  0 part
├─nvme1n1p2    259:9    0   512M  0 part
└─nvme1n1p3    259:10   0 237.9G  0 part
  └─lvmcrypt   254:0    0   1,8T  0 crypt
    ├─vg0-swap 254:1    0     8G  0 lvm
    ├─vg0-root 254:2    0   250G  0 lvm
    └─vg0-home 254:3    0   1.4T  0 lvm
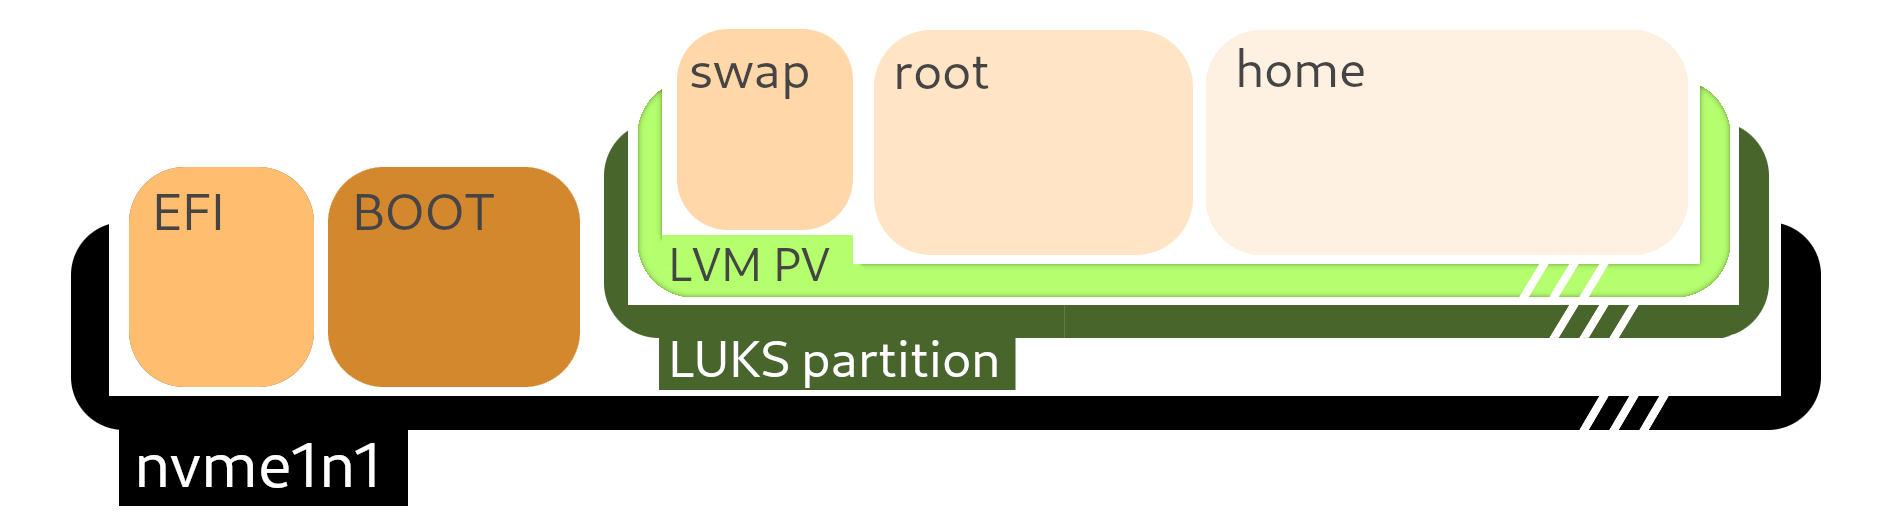
Illustration: final resizing results
.. but there are still some flaws.
duplicated UUIDs
In addition to the states of the block devices, the UUIDs and PARTUUIDs were also copied during mirroring. This is shown by a quick check with.
/dev/nvme0n1:  PTUUID=“b1aa601b-de7a-[..]“ PTTYPE=“gpt“
/dev/nvme0n1p1: UUID=“3B20-BA28“ BLOCK_SIZE=“512“ TYPE=“vfat“PARTUUID=“ffdf230a-[..]“
/dev/nvme0n1p2: UUID=“36c4aaa4-730e-[..]“ BLOCK_SIZE=“4096“ TYPE=“ext4“ PARTUUID=“f42bfc31-[..]“
/dev/nvme0n1p3: UUID=“be68a2e1-dc0e-[..]“ TYPE=“crypto_LUKS“ PARTUUID=“d7640400-9f06-[..]“

/dev/nvme1n1:  PTUUID=“b1aa601b-de7a-[..]“ PTTYPE=“gpt“
/dev/nvme1n1p1: UUID=“3B20-BA28“ BLOCK_SIZE=“512“ TYPE=“vfat“PARTUUID=“ffdf230a-[..]“
/dev/nvme1n1p2: UUID=“36c4aaa4-730e-[..]“ BLOCK_SIZE=“4096“ TYPE=“ext4“ PARTUUID=“f42bfc31-[..]“
/dev/nvme1n1p3: UUID=“be68a2e1-dc0e-[..]“ TYPE=“crypto_LUKS“ PARTUUID=“d7640400-9f06-[..]“
This means that there may be errors when addressing the respective media (depending on which device node is used to address the device). Assigning multiple identical UUIDs is not a good idea.
There are now three options for dealing with this problem:
Physical removal of the old SSD
Formatting the old SSD and thus assigning new UUIDs
Manual assignment of new UUIDs without formatting
Since I first wanted to check if the new system boots before formatting nvme0n1 and I was also too lazy to physically remove the SSD, I opted for variant 3 - the manual assignment of new UUIDs, but only for the needed partitions.
More precisely, I changed the UUIDs on the relevant partitions of nvme0n1, so that nvme1n1 kept the “old” UUIDs, saving me the work of adjusting entries in fstab afterwards.
new UUIDs
To change the UUID of the old boot partition nvme0n1p2, I used tune2fs.
Then I changed the UUID of the old crypt_LUKS partition on nvme0n1p3.
The state can now be checked again with
grub adjustments
As the last step before booting to the new SSD, I adjusted the cryptdevice to be used in the grub config. For this I mounted boot and root and chrooted into the system.
mount /dev/vg0/root /mnt
mount /dev/nvme0n1p2 /mnt/boot

mount --bind /dev /mnt/dev
mount --bind /proc /mnt/proc
mount --bind /sys /mnt/sys
mount --bind /run /mnt/run

chroot /mnt
Afterwards, the grub config can be changed with
I changed GRUB_CMD_LINUX
to
so that grub opens the correct new LUKS partition. Depending on the config, not a device note but a UUID is entered here.
Finally, the grub config must be applied with
The necessary changes are now made and I procced with
to exit chroot and unmount the system.
system boot
Now after all relevant changes were made, I rebooted the system and first checked in the BIOS/EFI whether the correct boot device was selected.
I was then able to boot into my desktop environment without any problems after entering my password and regularly decrypting the LUKS partition.
recap
Mirroring the old drive went more smoothly than initially thought. It was the first time I had performed a system move of this scale and even with documentation of my steps for this blog post, it took just under 60 minutes to complete.
With a new installation of my Arch system and its configuration, I would have spent much more time, so it was the right decision to go this way.
After the successful boot, nvme0n1 was formatted and will be used in the future as a separate disk for data storage or other purposes.
I will continue to use Windows 10 in the dual boot configuration, as there are still some use cases for which I need the system. However, I can now comfortably use my Linux system for 98% of the time - for all kinds of tasks, from productive use to gaming - I have enough storage space available for the moment.